Setting Up a LAMP Stack on Ubuntu 22.04: A Step-by-Step Guide

The LAMP stack (Linux, Apache, MySQL, PHP) is one of the most popular software stacks used for hosting dynamic websites and web applications. It provides a robust, open-source platform for developing and deploying web applications. In this guide, we'll walk you through the process of setting up a LAMP stack on an Ubuntu 22.04 server. By the end, you'll have Apache, MySQL, and PHP working together on your system, ready to serve your website or application.
Initial Setup and Requirements
Before we dive into the installation, make sure that you have the following prerequisites in place:
- A server running Ubuntu 22.04 with root or sudo access.
- Secure SSH access to your server.
- Familiarity with basic terminal commands.
If you haven't already, it’s also a good idea to update your system packages to ensure everything is up to date:
sudo apt update && sudo apt upgrade
This command will refresh the package index and install any available updates.
Step 1: Installing Apache
Apache is the most widely used web server globally, and it will serve the web pages for your LAMP setup. To install Apache, simply run the following command:
sudo apt install apache2
Once Apache is installed, it’s essential to ensure that it is running properly. You can check the status of Apache with:
sudo systemctl status apache2
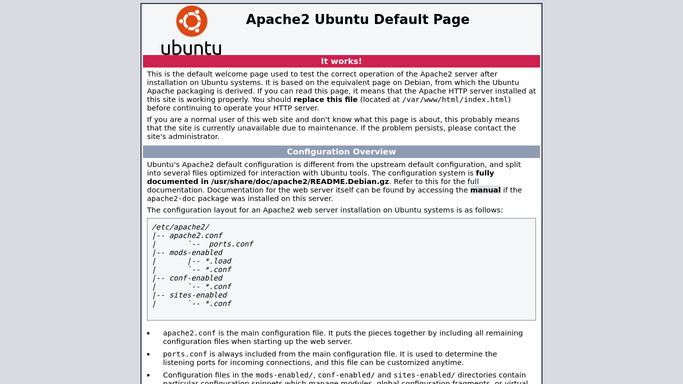
To confirm that Apache is working, you can access your server’s public IP address in a web browser. If everything is configured correctly, you should see the Apache default welcome page.
http://your_server_ip

Step 2: Installing MySQL
MySQL is the database management system (DBMS) used in the LAMP stack. It will handle storing and managing data for your website or web application. To install MySQL, run:
sudo apt install mysql-server
After the installation, it’s recommended to run the MySQL security script to secure your installation. This script will prompt you to set a root password and make other essential security configurations:
sudo mysql_secure_installationThe script will guide you through a series of prompts. For most of these, you can choose the default option by pressing Enter. Be sure to set a secure root password when prompted.
To verify that MySQL is running correctly, use:
sudo systemctl status mysql
Step 3: Installing PHP
PHP is the scripting language that will allow your web server to run dynamic content. To install PHP and some of the essential PHP modules, use the following command:
sudo apt install php libapache2-mod-php php-mysql
After PHP has been installed, you can test whether it’s working correctly by creating a simple PHP info file. First, navigate to Apache’s root directory:
sudo nano /var/www/html/info.php
In this file, add the following PHP code:
<?php
phpinfo();
?>
Save the file, exit the editor, and then visit the following URL in your browser:
http://your_server_ip/info.php
If PHP is working correctly, a page displaying information about your PHP configuration will appear.
Step 4: Configuring Apache to Use PHP
By default, Apache serves HTML files before PHP files. To change this behavior and prioritize PHP, we need to edit the dir.conf file:
sudo nano /etc/apache2/mods-enabled/dir.conf
In this file, move index.php to the first position, so the file looks like this:
<IfModule mod_dir.c>
    DirectoryIndex index.php index.html
</IfModule>
Save the file, and then restart Apache to apply the changes:
sudo systemctl restart apache2
Now, your Apache server will prioritize PHP files, meaning that if a directory contains both index.php and index.html, the PHP file will be served first.
Step 5: Testing and Final Steps
At this point, your LAMP stack should be fully functional. You can verify that Apache, MySQL, and PHP are working together by creating a PHP script that connects to the MySQL database. First, create a new PHP file in the Apache root directory:
sudo nano /var/www/html/test_db.php
In this file, add the following code to test the MySQL connection:
<?php
$servername = "localhost";
$username = "root";
$password = "your_mysql_root_password";

// Create connection
$conn = new mysqli($servername, $username, $password);

// Check connection
if ($conn->connect_error) {
    die("Connection failed: " . $conn->connect_error);
}
echo "Connected successfully";
?>
Be sure to replace your_mysql_root_password with the actual root password you set earlier.
Now, visit the following URL in your browser:
http://your_server_ip/test_db.php
If your PHP script can successfully connect to MySQL, the message “Connected successfully” will be displayed.
Finally, remember to remove the info.php and test_db.php files to prevent exposing sensitive information to the public:
sudo rm /var/www/html/info.php
sudo rm /var/www/html/test_db.php
Conclusion
Congratulations! You’ve successfully set up a LAMP stack on your Ubuntu 22.04 server. With Apache serving your web content, MySQL managing your databases, and PHP processing dynamic content, you’re ready to start developing and deploying web applications.
This guide offers a fundamental LAMP setup, but there are many more configurations and optimizations you can explore based on your project’s needs. Some recommended next steps include securing Apache further, setting up virtual hosts for multiple sites, and tuning MySQL performance.
By following this guide, you now have a solid foundation for building and hosting dynamic websites. Whether you’re developing a blog, an e-commerce site, or a web app, the LAMP stack provides a powerful and scalable solution for your needs.


